I can't believe how fast time flies! My daughter and her husband celebrated their one year wedding anniversary on the 28th of September. I still look back on the photo album fairly regularly, and I have a couple of enlargements throughout my home that I see on a daily basis; it was such a special time for our family.
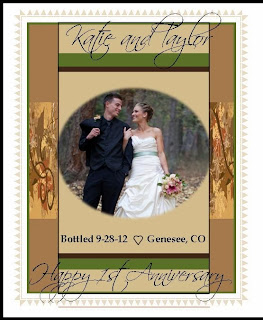
I knew I wanted to do a little something as a gift for the two of them....nothing too over-the-top, so I opted to make a wine label to commemorate the day. I used Microsoft publisher since it offers lots of options and I'm just really comfortable with the program since I use it a lot at work. I developed the design as I went along; I knew I wanted to use one of their wedding photos so I used that as my focal point and worked the other design elements around it. Since they were married in the fall, I used the fall colors we used as the theme throughout their wedding.

As far as the rest of the project goes, I removed the existing label off the front of the bottle by soaking it really well in water. I suspended it over a bowl, since I wanted to keep the back label. It really came off fairly easily; in three large pieces. I removed the first piece, then re-soaked and pulled off the second piece and one more soak and I was good.

I printed the the label on a buff colored resume' paper so it was a bit more sturdy than your standard copy paper. To adhere my label to the front, I used a glue stick. I felt it would cause the least amount of rippling, being more of a dry adhesive. It worked like an absolute charm, it went on so smoothly.

I decided to also make a wine bag out of some burlap that I had on hand from another project. I won't share the dimensions since it can vary depending upon the brand of wine you choose (due to the size/shape of the bottle). I serged it on three sides and then stitched a line from the bottom edge to the side in order to eliminate the pointy corners when it was turned right side out. Then, I added some fun embellishments to make it special.

I opted for a dessert wine; I thought it would go well with the wedding cake that has been in my freezer all this time. Yup! We saved the top of the cake for them, just like my husband and I did when we got married; and we did eat ours (I don't think I've ever met a cake I didn't like) Happy Anniversary-- Enjoy you two!!

 I knew I wanted to do a little something as a gift for the two of them....nothing too over-the-top, so I opted to make a wine label to commemorate the day. I used Microsoft publisher since it offers lots of options and I'm just really comfortable with the program since I use it a lot at work. I developed the design as I went along; I knew I wanted to use one of their wedding photos so I used that as my focal point and worked the other design elements around it. Since they were married in the fall, I used the fall colors we used as the theme throughout their wedding.
 As far as the rest of the project goes, I removed the existing label off the front of the bottle by soaking it really well in water. I suspended it over a bowl, since I wanted to keep the back label. It really came off fairly easily; in three large pieces. I removed the first piece, then re-soaked and pulled off the second piece and one more soak and I was good.
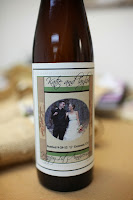
 I printed the the label on a buff colored resume' paper so it was a bit more sturdy than your standard copy paper. To adhere my label to the front, I used a glue stick. I felt it would cause the least amount of rippling, being more of a dry adhesive. It worked like an absolute charm, it went on so smoothly.
 I decided to also make a wine bag out of some burlap that I had on hand from another project. I won't share the dimensions since it can vary depending upon the brand of wine you choose (due to the size/shape of the bottle). I serged it on three sides and then stitched a line from the bottom edge to the side in order to eliminate the pointy corners when it was turned right side out. Then, I added some fun embellishments to make it special.
 I opted for a dessert wine; I thought it would go well with the wedding cake that has been in my freezer all this time. Yup! We saved the top of the cake for them, just like my husband and I did when we got married; and we did eat ours (I don't think I've ever met a cake I didn't like) Happy Anniversary-- Enjoy you two!!


.jpg)